Ricotta Gnocchi with Toasted Walnut-Gorgonzola Sauce

Ricotta Gnocchi

Have you ever discovered a really delicious dish at a restaurant, savored every last bite, and then spent the next few hours/days/weeks/months thinking about it, craving it, and wishing you knew how to make it just as good (if not better!) at home?

Have you ever caved in, dragged a loved one to breakfast/lunch/dinner, and gone back to said restaurant for justonemorebite, only to find out those fools have sold to new management and your beloved dish is no longer on the menu? Well, I’ve gotta tell you – it hurts. It hurts bad.

This is that dish.

I stumbled across it on a date with my husband in San Diego’s Little Italy several years ago, and have never really been able to get it out of my head. How did they make those gnocchi so soft, so delicate? How did they manage to make their sauce so rich and creamy, yet so light? What culinary trickery was this, and how oh how could I be trained in their ways?

Then it was gone. All gone. I was left with a profound feeling of loss that is difficult to articulate. It turns out that was just hunger, but man I was disappointed. I began scouring the Internet for gnocchi recipes, and was instantly intimidated. You want me to do what with a potato?! It wasn’t until I stumbled across this version made with ricotta and flour that I got up the nerve to get my gnocchi on.

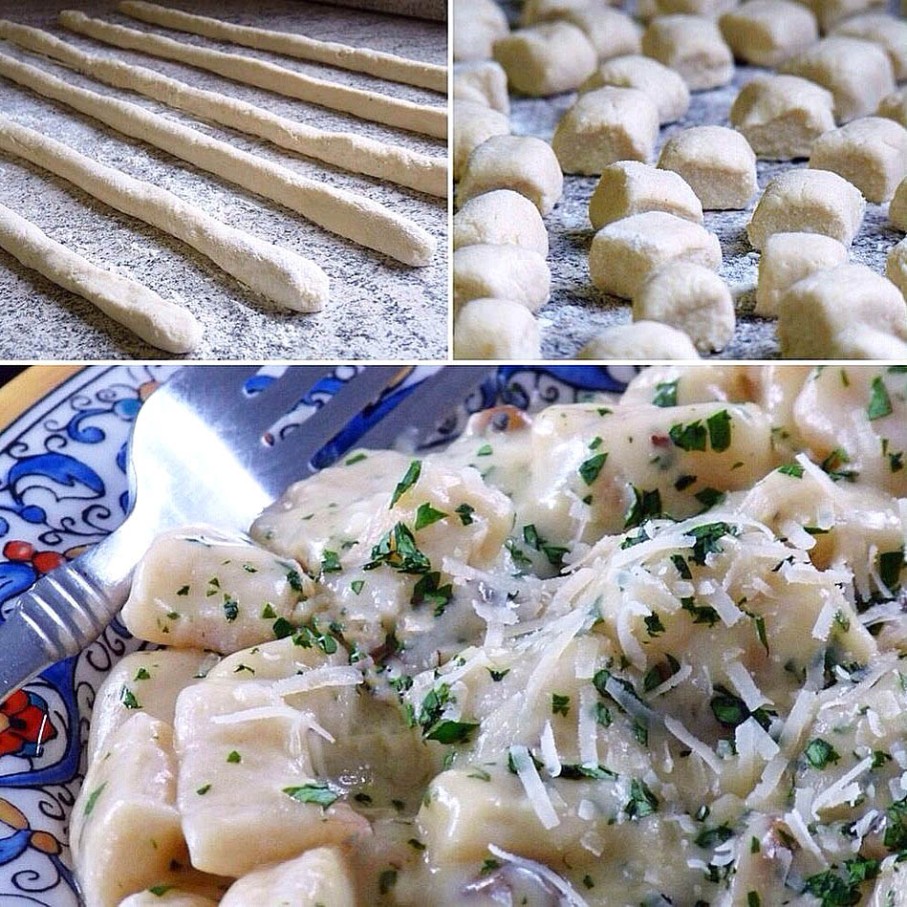
I don’t know what I was so afraid of! This brilliant recipe is both delicious and actually really easy, if you’re not afraid to get your hands a little dirty (or doughy, to be exact!). Paired with toasted walnuts and a simple, dreamy Gorgonzola sauce, this gnocchi is a perfect, incredibly tasty copy of that dish in San Diego. Phew!

What are some of your favorite restaurant dishes that you’d love to recreate at home?


RICOTTA GNOCCHI WITH TOASTED WALNUT-GORGONZOLA SAUCE

Yields | 4 to 6 servings

Inspiration | Framed Cooks and Ina Garten


For the gnocchi:

  • 16 ounces whole milk ricotta
  • 1 1/2 cups all-purpose flour
  • 2 tsp salt
  • 1 large fresh egg
  • 1/3 cup freshly grated Parmagiano-Reggiano cheese

For the sauce:

  • 2 tbsp unsalted butter
  • 1 cup toasted walnuts, roughly chopped
  • 2 cups heavy cream
  • 3 to 4 ounces crumbly Gorgonzola cheese (not creamy or dolce)
  • 6 tbsp freshly grated Parmagiano-Reggiano cheese
  • 3/4 tsp salt
  • 3/4 tsp freshly ground black pepper
  • 3 tbsp finely chopped fresh Italian parsley, to serve


To make the gnocchi:

  1. Place ricotta, flour, salt, egg and Parmagiano cheese in a medium-sized mixing bowl and stir well, until a wet dough forms.
  2. Turn dough onto a well-floured work surface and knead until it feels pliable and smooth (approximately 2 to 3 minutes).
  3. Divide dough into six equal portions. Roll each portion into a long rope the approximate width of your index finger, stretching as you roll (it’s okay if the ropes rip, as you’ll be cutting them into small pieces in the next step).
  4. Cut ropes into 1-inch pieces. Using a fork turned upside down, gently press the tines into each piece (this will later help the sauce cling to the gnocchi).
  5. Bring a large pot of water to a boil over medium-high heat.

[You’re not finished with the gnocchi yet, but this is a good time to turn to the sauce for a moment!]

To make the sauce:

  1. If not yet toasted, place the walnuts in a preheated 375 degree Fahrenheit oven for 3 minutes (if walnuts are already toasted, skip this step). Set aside.
  2. Melt the butter in a heavy-bottomed saucepan over medium heat. Add the walnuts and saute for two minutes. Add the cream, Gorgonzola, 3 tablespoons Parmagiano cheese, salt and pepper, stirring well to combine. Simmer over medium-low heat, stirring occasionally, for approximately 4 to 5 minutes, or until slightly thickened.

[Now, back to the gnocchi!]

To serve:

  1. While the sauce is thickening, carefully drop gnocchi into the boiling water. They will immediately sink to the bottom, but within 2 minutes will start floating to the water’s surface. At this point, your gnocchi is DONE – immediately remove from the boiling water with a slotted spoon, transfer to the simmering sauce, and toss to coat.
  2. Remove from heat, sprinkle with chopped parsley and remaining 3 tablespoons Parmagiano cheese, and serve immediately.

Broccoli Cheddar Soup

Broccoli Cheddar Soup FINAL.jpg

HAPPY NEW YEAR, lovely blog readers!!

We’re kicking off 2016 with chilly temps, gray skies and lots of rain showers here in southern Germany – as a native of the Pacific Northwest, this is just my kind of weather! For my cranky, sun-loving hubby, however, this is a less-than-desirable time of year. And like any good (read: wise and patient) wife confronted with her husband’s grumbling, I nod sympathetically, murmur words of understanding and encouragement, and placate. With soup.

When he requested this Broccoli Cheddar Soup last week, it took me all of 30 minutes to get dressed, throw on some makeup, and drive to the local grocery store for ingredients. Not only because I’ll do anything to turn his frown upside down, but because this soup is A-M-A-Z-I-N-G. Like better than Panera-style amazing (see Averie Cooks for the original recipe). It’s creamy, rich, and cheesy cheesy CHEESY. The secret to this soup is in fact super high quality, extra sharp Cheddar or Red Leicester cheese. While pre-shredded, bagged cheese has its place in the world, that place is not in this soup; the better the cheese, the better the flavor!


BROCCOLI CHEDDAR SOUP

Yields | 4 to 6 servings

  • 1 tbsp + 4 tbsp unsalted butter, divided
  • 1 small sweet yellow onion, minced
  • 1 clove fresh garlic, peeled and minced finely
  • 1/4 cup all-purpose flour
  • 2 cups low-sodium vegetable or chicken stock
  • 2 cups half-and-half (regular or fat-free)
  • 2 to 3 cups broccoli florets, diced into bite-size pieces
  • 2 large carrots, trimmed, peeled, and finely grated
  • 3/4 tsp salt, or to taste
  • 3/4 tsp freshly ground black pepper, or to taste
  • 1/2 tsp paprika (optional), and to taste
  • 1/2 tsp dry mustard powder (optional), and to taste
  • Pinch of cayenne pepper (optional), and to taste
  • 8 ounces grated high quality extra-sharp Cheddar or Red Leicester cheese, plus extra to serve


  1. In a small saucepan, melt 1 tablespoon butter over medium heat. Add minced onion and sauté, stirring occasionally, until the onion is translucent and turning lightly golden, about 4 minutes.
  2. Add garlic and cook for 30 seconds, stirring constantly so it doesn’t burn. Remove from heat and set pan aside.
  3. In a large heavy-bottom Dutch oven or soup pot, add 4 tablespoons butter, flour, and cook over medium heat for about 3 to 5 minutes (until flour is fully incorporated and thickened), whisking constantly.
  4. Slowly add the vegetable stock and half-and-half, whisking constantly. Allow mixture to simmer over low heat for approximately 15 to 20 minutes, or until it has reduced and thickened some. Whisk intermittently to re-incorporate the ‘skin’ that inevitably forms (this is normal).
  5. After simmering 15 to 20 minutes, add the broccoli, carrots, and the onion and garlic you previously set aside. Add the salt, pepper, optional paprika, optional dry mustard powder, and optional cayenne. Stir to combine.
  6. Allow soup to simmer over low heat for about 20 to 25 minutes, or until it has reduced and thickened some. Whisk intermittently to re-incorporate the ‘skin’ that inevitably forms, this is normal.
  7. After simmering for 20 to 25 minutes, add most of the cheese, reserving a small amount for garnishing bowls. Stir in the cheese until melted and incorporated fully, less than 1 minute. Transfer soup to bowls, garnish with reserved cheese, and serve immediately.

[Soup will keep airtight for 5 to 7 days in the fridge. Reheat gently in the microwave.]

Garlic + Herb-Stuffed Tomatoes

Garlic + Herb Stuffed Tomatoes


“Live life as if everything is rigged in your favor.” -Rumi

This statement hit me like a ton of bricks – in a good way! – when I heard it yesterday. This move from California to Germany has really tested my ability to ‘go with the flow’ – to let things fall into place without excessive hand-wringing, all-consuming worry, and internal meltdown on the scale of Fukushima. Where will we live? What will we do until our car arrives? How will I pay my student loans if we don’t have a second income? I can’t understand what anyone is saying!!!

Long story short, I need to chill the f___ out. I need to stop worrying. I need to stop dreading that every situation – finding a home, buying a car, getting a job, learning the language – is going to be difficult. I need to stop assuming that things won’t “work out”; that there will be nothing but hiccups, roadblocks, and doors slammed in our faces. I need to be strong enough and prepared enough to deal with the occasional challenge or disappointment – because there will be some, inevitably – but not ruminate about their eventuality. I need to take a deep breath, keep my chin up, and smile. I need to be positive, hopeful, and determined. I need to remember that I am extraordinarily blessed – with wonderful friends, the most loving family (furbabies included!), and a wealth of amazing experiences. Life truly is rigged in my favor. I need to start living it that way!

So, back to food. I was surprised and delighted to find a small kitchenette in our temporary accommodation here. It has just about everything I need to continue cooking and baking for our family until all of my pots, pans, and gadgets show up with our household goods in November. #rigged! The preparation space is a bit on the wee side, so I’m trying to keep our meals simple and healthy; this dish fit the bill on both counts!

The original recipe – from Food.com – listed the garlic as “optional”. Optional?! In my world view, garlic is never optional, and should be doubled whenever possible. I even swapped out Italian seasoned breadcrumbs for the garlic and herb variety. Sure, I’ll have raucous breath for a few days, but I’ve shared the wealth with my husband and so far we’re canceling each other out. That’s how it works … right?

This dish is easy to prepare and takes less than 30 minutes start to finish. My husband – who visibly cringed when I said “we’re having something vegetarian tonight” – gobbled up two of these as soon as they were cool enough to eat. So did I, despite never having been much of a tomato fan. Give them a try – you won’t regret it!


GARLIC + HERB-STUFFED TOMATOES

Yields | 5 servings

Inspiration | Food.com

  • 5 beefsteak tomatoes
  • 1 cup flat leaf parsley, chopped
  • 2 garlic cloves, minced
  • 3⁄4 cup Italian-seasoned breadcrumbs
  • 1 cup provolone cheese, grated
  • 1⁄4 tsp freshly ground black pepper
  • 1 tsp butter, softened
  • 2 tbsp extra virgin olive oil
  1. Preheat the oven to 375 degrees F.
  2. Slice the tops off the tomatoes and set aside. Scoop out the seeds and pulp from the tomatoes with a teaspoon, being careful not to cut through to the base or sides. Chop the pulp and keep the seeds, but discard the hard, central cores.
  3. Place the pulp and seeds in a medium bowl. Add the parsley, garlic, bread crumbs, cheese, and pepper and mix gently to combine.
  4. Place the hollowed tomatoes in a buttered casserole dish, and fill with the bread crumb mixture.
  5. Drizzle the top of the tomatoes with olive oil. Bake until the tops are browned, approximately 20 minutes.


ONE YEAR AGO: Baked Apple Cider Doughnuts

Apple Cider Doughnettes

Parmesan Polenta Tart with Heirloom Tomatoes

Parmesan Polenta Tart with Heirloom Tomatoes


Polenta – a dish made of yellow or white cornmeal boiled in water or stock into a thick, solidified porridge – is a popular cooking staple throughout central Europe, particularly northern Italy, France, and Switzerland. While I’d eaten it on a handful of occasions in the United States – usually at an Italian restaurant – I’d never before cooked with polenta until giving this recipe a try. I was pleasantly surprised – its remarkably easy to prepare and can be formed and set into virtually any shape.  It doesn’t have a great deal of flavor on its own, but with the addition of a flavorful stock or cheese, polenta is a wonderful base for meat stews, seafood, or vegetables.

This colorful wee tart – recipe courtesy of The View from Great Island – was a huge hit in our household! The tomatoes were delicious – a bit reminiscent of a chunky bruschetta topping – and looked absolutely beautiful arranged atop the bright yellow polenta base. My husband – who usually grumbles his way through anything vegetarian – ate 3/4 of the tart on his own. If that’s not an endorsement, I don’t know what is!


PARMESAN POLENTA TART WITH HEIRLOOM TOMATOES

Yields | 8 servings

Inspiration | The View from Great Island


  • 2 cups polenta (stone ground yellow corn meal)
  • 4 cups water
  • 2 cups reduced fat (2%) milk
  • 1 tsp salt
  • Freshly cracked black pepper
  • 3 tbsp unsalted butter
  • 1 cup grated Parmesan cheese + extra for garnishing
  • 1 generous pint multicolored cherry tomatoes
  • 1 medium heirloom tomato
  • 3 tbsp extra virgin olive oil
  • 1 or 2 tsp white wine vinegar
  • 2 cloves garlic, crushed and minced
  • Salt and black pepper to taste
  • 10 large basil leaves, cut in fine ribbons


  1. Bring the water, milk and salt to a boil in a heavy bottomed pot. Slowly add in the polenta, stirring to avoid lumps. Lower the heat and let it cook gently for about 15 minutes. You will have to stir it most of the time. I like to use a silicone spatula. Be careful because the polenta with splatter as it bubbles, and it’s hot.
  2. Take it off the heat and add the butter and the cheese. Mix well. Add some fresh cracked black pepper, and then taste and adjust the seasonings, if necessary.
  3. Pour the polenta into a greased 9″ springform pan or tart dish. (Note: I ended up using only 3/4 of the polenta, as I didn’t want my tart to be too thick.) Smooth it out quickly so the top is level. The polenta will begin to set up immediately. Let the polenta cool.
  4. Meanwhile, make the tomato topping. Do this no more than one hour before you want to serve the tart. Slice your cherry tomatoes in half. You can cut the larger ones in wedges, and leave the very tiniest ones whole. Chop the regular sized tomato in small chunks. Put them in a bowl with all the juices and add the oil, vinegar, garlic, salt and pepper.
  5. Let the tomatoes sit at room temperature to allow the juices to flow and mingle for up to an hour. Just before you are ready to put the tart together, chop the basil and add it to the tomatoes. (Note: don’t do this earlier, as the basil may turn dark)
  6. Just before you are ready to serve it, spoon the tomatoes and their juices on top of the polenta. Garnish with any remaining basil leaves and sprinkle generously with Parmesan cheese.
  7. Slice with a sharp knife and serve with more cheese.


Caprese Soup with Sourdough Grilled Cheese

Caprese Soup

Temperatures have FINALLY dipped below 50 degrees in Southern California, which can only mean it’s – da da da daaaah – SOUP WEATHER!

What to say about this recipe? It’s caprese. In a soup. And it’s A-M-A-Z-I-N-G with a buttery grilled cheese sandwich. Definitely a recipe for the ‘make this again!’ folder – enjoy!

CAPRESE SOUP WITH SOURDOUGH GRILLED CHEESE

Yields: 2 servings

  • 2 1/2 lbs fresh mixed tomatoes
  • 1 large garlic bulb, cut in half width-wise
  • 4 tablespoons extra-virgin olive oil, divided
  • 4 sundried tomatoes in oil
  • 1 tbsp soft brown sugar
  • 50 grams fresh basil leaves + extra to serve
  • 1 1/2 tbsp red wine vinegar
  • 1 (125 gram) ball fresh buffalo mozzarella
  • 4 slices sourdough bread
  • Butter
  • Cheddar (or other preferred sandwich) cheese
  1. Preheat oven to 400 degrees Fahrenheit (200 degrees Celsius). Place the tomatoes and garlic on a large roasting tray, drizzle with 1 tablespoon olive oil and roast in the oven for 25 minutes, or until tomatoes have burst and garlic is soft. Remove tray from oven and set aside to cool slightly.
  2. Squeeze the roasted garlic from its skin and place in a blender with the roasted tomatoes, sun dried tomatoes, sugar, 50 grams of basil, vinegar and 3 tablespoons olive oil. Blitz until smooth, then run through a sieve (if desired, to remove tomato seeds).
  3. Spread butter on both sides of bread slices. Place one slice on a preheated griddle or grill pan, cover with cheese slices and grill until bread is of desired texture and consistency. Top with second bread slice, flip sandwich, and grill as desired. Repeat with remaining bread slices and cheese.
  4. Transfer soup to serving bowls and top with shredded buffalo mozzarella and remaining basil. Serve heated through with grilled sandwiches.

*Previously published to my old blog, Cucina Fresca*