Black Bottom Cupcakes

Black Bottom Cupcakes

It occurred to me earlier this week that, as of late, this baking blog has been seriously lacking in one very important thing: BAKING. I could blame this on my recent love affair with soup (seriouslyhomemadesoupisthebestthingeverrrr), but the fact is I was just plain sugared out after the holidays. I don’t know about you, but I consumed so much cake, candy, and gluhwein in December (okay, and November) that I could hear my teeth screaming for mercy. With the face of my stern and ruthless Persian dentist in mind, I reluctantly placed a moratorium on baked goods.

If you’re a regular visitor to this blog, you probably know that’s when I re-discovered soup. We only ate soup on the rarest of occasions in California, because frankly, it’s way too blasted hot there. Much to my delight, however, German winters are ideal for soup making and eating, and I fell in love experimenting with all the recipes I’d collected – but never tried – over the years in San Diego. We enjoyed everything from Broccoli Cheddar to Zuppa Toscana, from Cream of Wild Mushroom to Cheesy Potato Bacon. We ate soup for breakfast, lunch and dinner, and probably – no joke – a few times for dessert. We lost ourselves in those heady days of cream and broth and bacon. In the meantime, my oven sat neglected, patiently waiting for me to get back to the business of baking.

Oh sweet oven, you know me so well. Late last week, I started getting that all-too-familiar hankering for chocolate. It started off subtle, but by the weekend I was pawing through my recipes looking for something to satisfy my sweet tooth. When I stumbled across these cupcakes – one of my childhood favorites – I knew I was back in the baking game. And thank goodness – I wasn’t keen on starting a Soup Goddess blog!

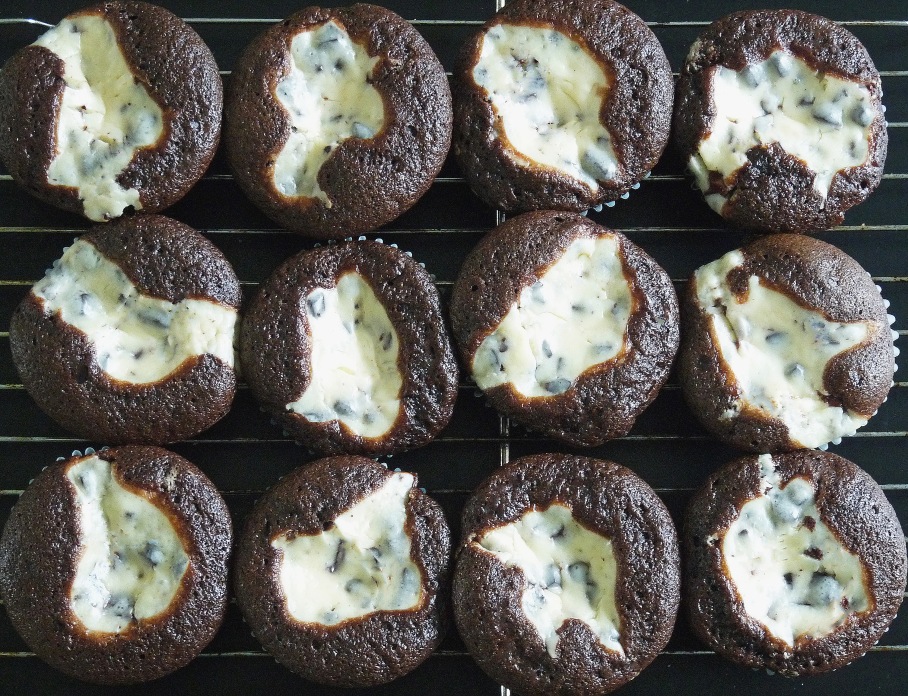
Black Bottom Cupcakes instantly remind me of my lovely aunt Rebecca, who frequently brought these to family picnics, potlucks and camping trips when I was growing up in the Pacific Northwest. I hadn’t had one in years, but was immediately transported back to the blissfully happy days of my youth as soon as these emerged from the oven. They are a delicious combination of decadent chocolate cake and rich, lightly sweetened cheesecake, studded with semi-sweet or dark chocolate chips. They’re an especially attractive dessert for those that love cake but hate the occasionally cloying sweetness of frosting. Enjoy in moderation!

Black Bottom Cupcakes1


BLACK BOTTOM CUPCAKES

Yields | 14-16 cupcakes

Inspiration | my aunt Rebecca

  • 1 1/3 cup finely granulated sugar, divided
  • ¼ cup high-quality unsweetened cocoa powder
  • 1 ½ cups all-purpose flour
  • 1/8 tsp salt
  • 1 tsp baking soda
  • 1 cup freshly brewed coffee, cooled
  • 1/3 cup vegetable or canola oil
  • 1 tbsp apple cider vinegar
  • 1 ½ tsp pure vanilla extract
  • 8 ounces cream cheese, softened to room temperature (do not microwave!)
  • 1 large fresh egg
  • 6 ounces dark or semi-sweet chocolate, chopped


  1. Preheat oven to 350 degrees Fahrenheit (175 degrees Celsius). Line two 12-cup muffin tins with paper cupcake liners and set aside.
  2. Place 1 cup finely granulated sugar, cocoa powder, flour, salt and baking soda in the bowl of an electric mixer. Add coffee and oil and mix on medium speed for 2 to 3 minutes. Add vinegar and 1 teaspoon vanilla extract, then blend on medium speed for an additional 30 seconds.
  3. Fill each paper liner half full with chocolate batter. Set aside.
  4. Clean and wipe dry the mixing bowl. On medium speed, blend cream cheese, 1/3 cup finely granulated sugar, 1/2 teaspoon vanilla extract and egg until smooth and creamy. (Note: DO NOT OVER MIX. Blend just until lumps disappear, no more than 30 seconds.) Add chopped chocolate pieces and stir to incorporate. Top chocolate batter with one heaping teaspoonful of cream cheese mixture.
  5. Bake for 23 to 25 minutes in preheated oven. Remove from muffin tins immediately and cool thoroughly on a wire rack. The insides will be gooey if eaten within the first hour, but will set thereafter. If you prefer the gooey texture, microwave for 10 to 15 seconds before eating.

Hungarian Gulyás (Goulash)

Hungarian Goulash

Oh baby, it’s cold outside!

2016 is off to a very chilly start in southern Germany – the perfect excuse to snuggle up in front of the fireplace, to wear cozy slippers all weekend long AND to dig deep in my recipe box for new and delicious soups and stews. I’ve been eyeing this recipe for traditional Hungarian gulyás since the beginning of the month, when my husband and I shared fond memories of a brilliant culinary holiday in Budapest for New Year’s Day 2012. The experience had been a first for both of us – his first goulash ever, and my first that wasn’t made with the loving hands of my adorable Polish grandmother. My husband polished off three bowls in one sitting on our first night in Pest, then continued to enjoy it everywhere we went in Hungary’s capital for the rest of our holiday. I hadn’t made it since, but this past weekend – snowy and well below freezing – seemed like the perfect opportunity to walk down a delectable memory lane.

Gulyás (goulash) – a soup or stew made of meat or vegetables, seasoned with paprika and a variety of other spices – is the type of recipe that exists on a very wide taste spectrum. In other words, I’ve never run across a goulash that contains the exact same ingredients in the exact same quantity as another. While sweet, high quality Hungarian paprika is essential, and other additions – onion, garlic, caraway seeds, and bell peppers – are fairly standard, the contents can otherwise be tailored to an individual palate. I tossed in some of my husband’s favorites – tomatoes, carrots, potatoes, beef cheeks and red bell peppers – but encourage you to use the flavors and textures you enjoy. Serve with csipetke (small, pinched egg noodles, also known as spätzle in Germany) or a thick, crusty loaf of bread on your next chilly winter’s day – you won’t regret it!


HUNGARIAN GULYAS (GOULASH)

Yields | 4 to 6 servings

Inspiration | The Daring Gourmet

  • 3 tbsp pork lard
  • 1 large yellow onion, chopped
  • ¼ cup high quality, sweet Hungarian paprika
  • 1½ pounds beef (see note), cut into ½-inch pieces
  • 5 cloves fresh garlic, minced
  • 2 red bell peppers, seeded and membranes removed, cut into ½-inch chunks
  • 1 yellow bell pepper, seeded and membranes removed, cut into ½-inch chunks
  • 2 fresh tomatoes, diced
  • 2 fresh carrots, diced
  • 2 medium potatoes, cut into ½-inch chunks
  • 5 cups beef broth
  • 1 bay leaf
  • 1 tsp caraway seeds
  • 1 tsp salt
  • ½ tsp freshly ground black pepper
  • Chopped flat-leaf parsley, to serve (optional)


  1. Melt the lard in a Dutch oven over medium high heat. Add chopped onion and cook until slightly browned, about 7-10 minutes. Remove from heat and stir in the paprika. Add the beef and garlic, return to the heat, and cook for approximately 10 minutes, or until the beef is no longer pink.
  2. Add the bell peppers and cook for another 7 to 8 minutes. Add the carrots, tomatoes, potatoes, beef broth, bay leaf, caraway seeds, salt and pepper. Bring to a boil, cover, reduce the heat to medium, and simmer for 40 minutes (see note). Add salt to taste.
  3. Transfer to serving bowls and sprinkle with chopped flat-leaf parsley, if desired. Serve with a dollop of plain yogurt, csipetke or thick, crusty bread.

Note: If you’re using a tougher cut of beef, cook the beef first, without the carrots, tomatoes, potatoes and bell peppers, for 30-45 minutes, then add the vegetables and cook for another 40 minutes, until the beef is tender.

Toasted Almond Brittle

Toasted Almond Brittle1

My mum and I made this SUPER easy recipe for brittle (courtesy of Cooking Light magazine) a few years ago, and its still one of my favorite candy recipes. The crunchy sweetness of this almond version beats the peanut variety any day, and its low fat and low calorie content are perfect for sweet tooths trying to ease off desserts after the holidays. It’s also ready to consume in under 45 minutes – what could be better? Enjoy in moderation!


TOASTED ALMOND BRITTLE

Yields | 12 to 14 servings

  •  1 cup finely granulated sugar
  • 1/2 cup light corn syrup
  • 3/4 cup coarsely chopped almonds, toasted
  • 1 tbsp butter
  • 1/2 tsp pure vanilla extract
  • 1/8 tsp salt
  • 1 tsp baking soda


1.  Line a jelly-roll pan or rimmed baking sheet with parchment paper. Set aside.

2.  Combine sugar and syrup in a 2-quart microwave bowl. Microwave on HIGH for 3 minutes (sugar mixture will appear clear and bubbly).

3.  Stir in almonds. Microwave on HIGH for 3 minutes or until mixture is a light caramel color, stirring every minute.

4.  Stir in butter, vanilla and salt. Microwave on HIGH for 1 1/2 minutes or until mixture is the color of peanut butter. Add baking soda and stir until the mixture is foamy.

5.  Quickly pour mixture onto prepared pan. Spread to 1/4-inch thickness and let stand for 30 minutes. Break brittle into pieces to serve.


Per serving:  142 calories, 4 grams fat (0.8 grams saturated), 1.3 grams protein, 27.3 grams carbohydrates, 0.8 grams fiber, 2 mg cholesterol, 0.2 mg iron, 136 mg sodium.

Broccoli Cheddar Soup

Broccoli Cheddar Soup FINAL.jpg

HAPPY NEW YEAR, lovely blog readers!!

We’re kicking off 2016 with chilly temps, gray skies and lots of rain showers here in southern Germany – as a native of the Pacific Northwest, this is just my kind of weather! For my cranky, sun-loving hubby, however, this is a less-than-desirable time of year. And like any good (read: wise and patient) wife confronted with her husband’s grumbling, I nod sympathetically, murmur words of understanding and encouragement, and placate. With soup.

When he requested this Broccoli Cheddar Soup last week, it took me all of 30 minutes to get dressed, throw on some makeup, and drive to the local grocery store for ingredients. Not only because I’ll do anything to turn his frown upside down, but because this soup is A-M-A-Z-I-N-G. Like better than Panera-style amazing (see Averie Cooks for the original recipe). It’s creamy, rich, and cheesy cheesy CHEESY. The secret to this soup is in fact super high quality, extra sharp Cheddar or Red Leicester cheese. While pre-shredded, bagged cheese has its place in the world, that place is not in this soup; the better the cheese, the better the flavor!


BROCCOLI CHEDDAR SOUP

Yields | 4 to 6 servings

  • 1 tbsp + 4 tbsp unsalted butter, divided
  • 1 small sweet yellow onion, minced
  • 1 clove fresh garlic, peeled and minced finely
  • 1/4 cup all-purpose flour
  • 2 cups low-sodium vegetable or chicken stock
  • 2 cups half-and-half (regular or fat-free)
  • 2 to 3 cups broccoli florets, diced into bite-size pieces
  • 2 large carrots, trimmed, peeled, and finely grated
  • 3/4 tsp salt, or to taste
  • 3/4 tsp freshly ground black pepper, or to taste
  • 1/2 tsp paprika (optional), and to taste
  • 1/2 tsp dry mustard powder (optional), and to taste
  • Pinch of cayenne pepper (optional), and to taste
  • 8 ounces grated high quality extra-sharp Cheddar or Red Leicester cheese, plus extra to serve


  1. In a small saucepan, melt 1 tablespoon butter over medium heat. Add minced onion and sauté, stirring occasionally, until the onion is translucent and turning lightly golden, about 4 minutes.
  2. Add garlic and cook for 30 seconds, stirring constantly so it doesn’t burn. Remove from heat and set pan aside.
  3. In a large heavy-bottom Dutch oven or soup pot, add 4 tablespoons butter, flour, and cook over medium heat for about 3 to 5 minutes (until flour is fully incorporated and thickened), whisking constantly.
  4. Slowly add the vegetable stock and half-and-half, whisking constantly. Allow mixture to simmer over low heat for approximately 15 to 20 minutes, or until it has reduced and thickened some. Whisk intermittently to re-incorporate the ‘skin’ that inevitably forms (this is normal).
  5. After simmering 15 to 20 minutes, add the broccoli, carrots, and the onion and garlic you previously set aside. Add the salt, pepper, optional paprika, optional dry mustard powder, and optional cayenne. Stir to combine.
  6. Allow soup to simmer over low heat for about 20 to 25 minutes, or until it has reduced and thickened some. Whisk intermittently to re-incorporate the ‘skin’ that inevitably forms, this is normal.
  7. After simmering for 20 to 25 minutes, add most of the cheese, reserving a small amount for garnishing bowls. Stir in the cheese until melted and incorporated fully, less than 1 minute. Transfer soup to bowls, garnish with reserved cheese, and serve immediately.

[Soup will keep airtight for 5 to 7 days in the fridge. Reheat gently in the microwave.]