Honey Mustard Chicken, Bacon + Avocado Salad

hcba-salad-copy

I can’t believe I’ve reached the last few weeks of summer and posted only posted TWO recipes to this blog. Bad food blogger, bad!

Perhaps I should give myself a bit of lee-way; it’s been a busy and at times difficult summer. Between a stressful job, a house full of much-loved guests, and a spouse with multiple broken bones from a sports injury, there hasn’t been much time to sit down and breathe, let alone focus on blogging (or much of anything else). Only after quitting my job, bidding fond farewell to our wonderful guests, and putting my hubs on the road to recovery has life finally slowed down to an easier pace. Halle-freaking-lujah!

Of course, I’m one of those people that – despite wanting a break for months – has to fill their first waking moment of free time with activity. In this case, I was only 10 minutes into relaxing on the couch with some Investigation Discovery (it’saddictiveAF) before deciding to have a casual peek at my recipe collection. Casual peek quickly transformed into detailed research, which then morphed into a cooking and baking agenda for the next four months (and a shopping list as long as a novel). And so went my rest time; I was on my way to the market before the murder had even been solved. It was nice knowing you, R & R!

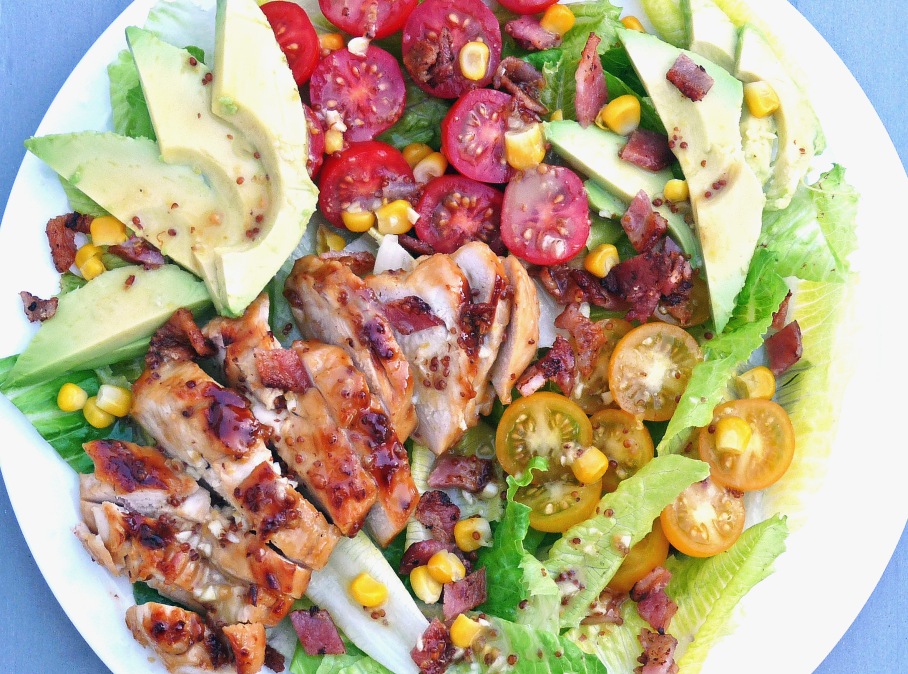
All credit for this beautiful salad recipe goes to Cafe Delites, one of my favorite blogs of all time. The garlicky honey mustard dressing is the BOMB.COM – I’m not a mustard fan by any means, yet I devoured this salad in under 5 minutes! It also makes an unbelievably delicious marinade for the chicken – my husband already requested that I make this again soon. It’s a definite keeper – enjoy!


HONEY MUSTARD CHICKEN, BACON + AVOCADO SALAD

Yields: 4 servings

For the marinade/dressing:

  • ⅓ cup clear honey
  • 3 tbsp whole grain mustard
  • 2 tbsp smooth + mild Dijon mustard
  • 2 tablespoons extra-virgin olive oil
  • 1 tbsp finely minced garlic
  • Salt, to season
  • 4 boneless, skinless chicken breasts

For the salad:

  • ¼ cup diced bacon, trimmed of rind and fat
  • 4 cups Romaine lettuce leaves, washed
  • 1 cup sliced grape or cherry tomatoes
  • 1 large avocado, pitted and sliced
  • ¼ cup corn kernels


  1. Whisk marinade / dressing ingredients (through salt) together to combine. Pour half into a shallow dish, submerge chicken and marinade for  1 1/2 to 2 hours. Refrigerate the reserved marinade to use as a dressing.
  2. Heat one teaspoon of olive oil in a nonstick pan (or grill pan or skillet) over medium high heat. Once very hot, add chicken and cook, undisturbed, for 3-5 minutes, or until nicely browned on one side. Turn chicken over, cover, and reduce heat to medium. Cook for approximately 5 more minutes (depending on thickness of chicken), or until chicken is cooked through. Remove to a cutting board and let rest at least 5 minutes before slicing.  (Grill in batches to prevent excess water being released. Dispose of used marinade.)
  3. Wipe pan over with paper towel; drizzle with another teaspoon of oil and fry the bacon until crispy.
  4. Slice chicken into strips and prepare salad with leaves, tomatoes, avocado slices, corn and chicken.
  5. Whisk 2 tablespoons of water into the remaining dressing and drizzle over the salad. Sprinkle the bacon over the top and season with salt and freshly cracked pepper, if desired.

Habanero Turkey Chili with Honey Buttermilk Cornbread


Habanero Turkey Chili

It’s been a long, lonnnng time since I’ve posted to this blog, but I’m happy to be back with new recipes (the result of lots of summer cooking and baking!) this week. Hopefully this post kick starts my lazy blogging bum into gear, and I’ll be back with more recipes in the weeks and months to come!

This spicy homemade chili has been a family favorite for years. Adapted from the recipe for Boilermaker Tailgate Chili on AllRecipes.com, it’s also been my go-to meal for the happy occasions this summer that we’ve welcomed family and friends to our home in southern Germany. Despite the rather intimidating number of ingredients listed, this chili couldn’t be easier to prepare for a large group of weary, jet-lagged world travelers desperately in need of a protein boost. And if the protein doesn’t wake them up, the flavor surely will – this chili is spicy with a capital S. I personally like to take my spice level to the brink of hospitalization, but feel free to tinker with the amount of chili powder added if pepper-induced sobbing just isn’t your jam. (I recommend 2 tablespoons instead of 1/4 cup for those with less heat tolerance.)

And finally, let’s talk about cornbread. I LOVE cornbread. I’ve tried every conceivable type of cornbread known to man or woman, and this recipe is HANDS DOWN the best. It has the rare combination of perfect flavor (not too sweet, not too bland) and perfect consistency (not too cake-like, not too dry). I can’t imagine a better accompaniment to this spicy chili. Enjoy!


HABANERO TURKEY CHILI WITH HONEY BUTTERMILK CORNBREAD

Yield | 12 servings

For the chili:

  • 2 pounds ground turkey
  • 1 pound hot Italian sausage
  • 4 (15 ounce) cans chili beans in sauce
  • 2 (28 ounce) cans diced tomatoes
  • 1 (6 ounce) can tomato paste
  • 1 medium yellow onion, finely chopped
  • 1-2 habanero peppers, seeded + minced
  • 4 cubes beef (or chicken) bouillon
  • 1/2 cup beer
  • 1/4 cup chili powder
  • 1 tbsp Worcestershire sauce
  • 1-2 tbsp minced fresh garlic
  • 1 tbsp dried oregano
  • 2 tsp ground cumin
  • 2 tsp hot pepper sauce
  • 1 tsp dried basil
  • 1 tsp salt
  • 1 tsp ground black pepper
  • 1/2-1 tsp ground cayenne pepper
  • 1 tsp paprika
  • 1 tsp white sugar
  • Sharp cheddar cheese, shredded, to serve

For the cornbread:

  • ½ cup butter
  • 1 tbsp clear honey
  • 2/3 cup white sugar
  • 2 fresh eggs
  • 1 cup buttermilk
  • ½ tsp baking soda
  • 1 cup yellow cornmeal
  • 1 cup all-purpose flour
  • ½ tsp salt


To make the chili:

  1. Heat a large stock pot over medium-high heat. Crumble the ground turkey and sausage into the hot pan, and cook until evenly browned. Drain off excess grease.
  2.  Pour in the chili beans, diced tomatoes and tomato paste. Add the onion, habanero peppers, bouillon, and beer. Season with chili powder and remaining ingredients (through sugar). Stir to blend, then cover and simmer over low heat for at least 2 hours, stirring occasionally.
  3. After 2 hours, taste, and adjust salt, pepper, and chili powder if necessary. The longer the chili simmers, the better it will taste. Remove from heat and serve, topped with shredded cheddar cheese (or refrigerate and serve the next day).

To make the cornbread:

  1. Preheat oven to 375 degrees F (175 degrees C). Grease an 8 inch square pan.
  2. Melt butter and honey in large skillet. Remove from heat and stir in sugar. Quickly add eggs and beat until well blended. Combine buttermilk with baking soda and stir into mixture in pan. Stir in cornmeal, flour, and salt until well blended and few lumps remain. Pour batter into the prepared pan.
  3. Bake in the preheated oven for 30 to 40 minutes, or until a toothpick inserted in the center comes out clean.

Ricotta Gnocchi with Toasted Walnut-Gorgonzola Sauce

Ricotta Gnocchi

Have you ever discovered a really delicious dish at a restaurant, savored every last bite, and then spent the next few hours/days/weeks/months thinking about it, craving it, and wishing you knew how to make it just as good (if not better!) at home?

Have you ever caved in, dragged a loved one to breakfast/lunch/dinner, and gone back to said restaurant for justonemorebite, only to find out those fools have sold to new management and your beloved dish is no longer on the menu? Well, I’ve gotta tell you – it hurts. It hurts bad.

This is that dish.

I stumbled across it on a date with my husband in San Diego’s Little Italy several years ago, and have never really been able to get it out of my head. How did they make those gnocchi so soft, so delicate? How did they manage to make their sauce so rich and creamy, yet so light? What culinary trickery was this, and how oh how could I be trained in their ways?

Then it was gone. All gone. I was left with a profound feeling of loss that is difficult to articulate. It turns out that was just hunger, but man I was disappointed. I began scouring the Internet for gnocchi recipes, and was instantly intimidated. You want me to do what with a potato?! It wasn’t until I stumbled across this version made with ricotta and flour that I got up the nerve to get my gnocchi on.

I don’t know what I was so afraid of! This brilliant recipe is both delicious and actually really easy, if you’re not afraid to get your hands a little dirty (or doughy, to be exact!). Paired with toasted walnuts and a simple, dreamy Gorgonzola sauce, this gnocchi is a perfect, incredibly tasty copy of that dish in San Diego. Phew!

What are some of your favorite restaurant dishes that you’d love to recreate at home?


RICOTTA GNOCCHI WITH TOASTED WALNUT-GORGONZOLA SAUCE

Yields | 4 to 6 servings

Inspiration | Framed Cooks and Ina Garten


For the gnocchi:

  • 16 ounces whole milk ricotta
  • 1 1/2 cups all-purpose flour
  • 2 tsp salt
  • 1 large fresh egg
  • 1/3 cup freshly grated Parmagiano-Reggiano cheese

For the sauce:

  • 2 tbsp unsalted butter
  • 1 cup toasted walnuts, roughly chopped
  • 2 cups heavy cream
  • 3 to 4 ounces crumbly Gorgonzola cheese (not creamy or dolce)
  • 6 tbsp freshly grated Parmagiano-Reggiano cheese
  • 3/4 tsp salt
  • 3/4 tsp freshly ground black pepper
  • 3 tbsp finely chopped fresh Italian parsley, to serve


To make the gnocchi:

  1. Place ricotta, flour, salt, egg and Parmagiano cheese in a medium-sized mixing bowl and stir well, until a wet dough forms.
  2. Turn dough onto a well-floured work surface and knead until it feels pliable and smooth (approximately 2 to 3 minutes).
  3. Divide dough into six equal portions. Roll each portion into a long rope the approximate width of your index finger, stretching as you roll (it’s okay if the ropes rip, as you’ll be cutting them into small pieces in the next step).
  4. Cut ropes into 1-inch pieces. Using a fork turned upside down, gently press the tines into each piece (this will later help the sauce cling to the gnocchi).
  5. Bring a large pot of water to a boil over medium-high heat.

[You’re not finished with the gnocchi yet, but this is a good time to turn to the sauce for a moment!]

To make the sauce:

  1. If not yet toasted, place the walnuts in a preheated 375 degree Fahrenheit oven for 3 minutes (if walnuts are already toasted, skip this step). Set aside.
  2. Melt the butter in a heavy-bottomed saucepan over medium heat. Add the walnuts and saute for two minutes. Add the cream, Gorgonzola, 3 tablespoons Parmagiano cheese, salt and pepper, stirring well to combine. Simmer over medium-low heat, stirring occasionally, for approximately 4 to 5 minutes, or until slightly thickened.

[Now, back to the gnocchi!]

To serve:

  1. While the sauce is thickening, carefully drop gnocchi into the boiling water. They will immediately sink to the bottom, but within 2 minutes will start floating to the water’s surface. At this point, your gnocchi is DONE – immediately remove from the boiling water with a slotted spoon, transfer to the simmering sauce, and toss to coat.
  2. Remove from heat, sprinkle with chopped parsley and remaining 3 tablespoons Parmagiano cheese, and serve immediately.

Baked Ginger Honey Chicken Wings

Ginger Honey Chicken Wings2

Super Bowl weekend is finally upon us, which can only mean one thing – GAME DAY SNACKS!!! Oh, and football. And I guess some people really dig the commercials … and the half-time show … and the endless supply of cheap American beer. But seriously, it’s not about that. Any of that. IT’S ALL ABOUT THE FOOD.

Well, it is in our house anyway. While my husband and I are pretty ambivalent about who wins and who loses, we’re definitely excited about stuffing ourselves silly from opening kick-off to final whistle with these yummy homemade chicken wings. Bathed in a palate-pleasing mixture of soy sauce, honey, ginger and (lots and lots of) garlic, these baked wings can be thrown together by even the most novice chef in less than 30 minutes – with no frying or messy clean-up!

Enjoy in moderation!

*** Looking for something a little spicier? Try my recipe for Spicy Honey Hot Wings! ***


BAKED GINGER HONEY CHICKEN WINGS

Yields | 6 to 8 servings

Inspiration | Simply Recipes

  • Canola or olive oil
  • 1/4 cup soy sauce
  • 3 tbsp clear honey
  • 1 inch piece of fresh ginger, peeled + finely minced
  • 3 cloves fresh garlic, finely minced
  • 1/8 tsp Sriracha (or other hot sauce)
  • 3 lbs raw chicken wings (or drumettes)
  • 2 tbsp toasted sesame seeds
  • 1 green onion, thinly sliced on the diagonal


  1. Preheat oven to 425° Fahrenheit (215° Celsius) with baking rack on the upper third of the oven. Line a roasting pan or thick baking sheet with foil. Rub some canola or olive oil over the foil to keep the wings from sticking.
  2. In a large bowl, whisk together soy sauce, honey, ginger, garlic and Sriracha hot sauce. Add wings and toss to coat thoroughly. Arrange skin-side down on prepared roasting pan or baking sheet, taking care not to crowd the wings.
  3. Roast in oven for 15 minutes. Remove from oven, and – using tongs – flip wings over so they are skin-side up. Return to oven and bake for 10 additional minutes, until nicely browned. Remove from oven and cool for 5 minutes before serving.

Hungarian Gulyás (Goulash)

Hungarian Goulash

Oh baby, it’s cold outside!

2016 is off to a very chilly start in southern Germany – the perfect excuse to snuggle up in front of the fireplace, to wear cozy slippers all weekend long AND to dig deep in my recipe box for new and delicious soups and stews. I’ve been eyeing this recipe for traditional Hungarian gulyás since the beginning of the month, when my husband and I shared fond memories of a brilliant culinary holiday in Budapest for New Year’s Day 2012. The experience had been a first for both of us – his first goulash ever, and my first that wasn’t made with the loving hands of my adorable Polish grandmother. My husband polished off three bowls in one sitting on our first night in Pest, then continued to enjoy it everywhere we went in Hungary’s capital for the rest of our holiday. I hadn’t made it since, but this past weekend – snowy and well below freezing – seemed like the perfect opportunity to walk down a delectable memory lane.

Gulyás (goulash) – a soup or stew made of meat or vegetables, seasoned with paprika and a variety of other spices – is the type of recipe that exists on a very wide taste spectrum. In other words, I’ve never run across a goulash that contains the exact same ingredients in the exact same quantity as another. While sweet, high quality Hungarian paprika is essential, and other additions – onion, garlic, caraway seeds, and bell peppers – are fairly standard, the contents can otherwise be tailored to an individual palate. I tossed in some of my husband’s favorites – tomatoes, carrots, potatoes, beef cheeks and red bell peppers – but encourage you to use the flavors and textures you enjoy. Serve with csipetke (small, pinched egg noodles, also known as spätzle in Germany) or a thick, crusty loaf of bread on your next chilly winter’s day – you won’t regret it!


HUNGARIAN GULYAS (GOULASH)

Yields | 4 to 6 servings

Inspiration | The Daring Gourmet

  • 3 tbsp pork lard
  • 1 large yellow onion, chopped
  • ¼ cup high quality, sweet Hungarian paprika
  • 1½ pounds beef (see note), cut into ½-inch pieces
  • 5 cloves fresh garlic, minced
  • 2 red bell peppers, seeded and membranes removed, cut into ½-inch chunks
  • 1 yellow bell pepper, seeded and membranes removed, cut into ½-inch chunks
  • 2 fresh tomatoes, diced
  • 2 fresh carrots, diced
  • 2 medium potatoes, cut into ½-inch chunks
  • 5 cups beef broth
  • 1 bay leaf
  • 1 tsp caraway seeds
  • 1 tsp salt
  • ½ tsp freshly ground black pepper
  • Chopped flat-leaf parsley, to serve (optional)


  1. Melt the lard in a Dutch oven over medium high heat. Add chopped onion and cook until slightly browned, about 7-10 minutes. Remove from heat and stir in the paprika. Add the beef and garlic, return to the heat, and cook for approximately 10 minutes, or until the beef is no longer pink.
  2. Add the bell peppers and cook for another 7 to 8 minutes. Add the carrots, tomatoes, potatoes, beef broth, bay leaf, caraway seeds, salt and pepper. Bring to a boil, cover, reduce the heat to medium, and simmer for 40 minutes (see note). Add salt to taste.
  3. Transfer to serving bowls and sprinkle with chopped flat-leaf parsley, if desired. Serve with a dollop of plain yogurt, csipetke or thick, crusty bread.

Note: If you’re using a tougher cut of beef, cook the beef first, without the carrots, tomatoes, potatoes and bell peppers, for 30-45 minutes, then add the vegetables and cook for another 40 minutes, until the beef is tender.

Broccoli Cheddar Soup

Broccoli Cheddar Soup FINAL.jpg

HAPPY NEW YEAR, lovely blog readers!!

We’re kicking off 2016 with chilly temps, gray skies and lots of rain showers here in southern Germany – as a native of the Pacific Northwest, this is just my kind of weather! For my cranky, sun-loving hubby, however, this is a less-than-desirable time of year. And like any good (read: wise and patient) wife confronted with her husband’s grumbling, I nod sympathetically, murmur words of understanding and encouragement, and placate. With soup.

When he requested this Broccoli Cheddar Soup last week, it took me all of 30 minutes to get dressed, throw on some makeup, and drive to the local grocery store for ingredients. Not only because I’ll do anything to turn his frown upside down, but because this soup is A-M-A-Z-I-N-G. Like better than Panera-style amazing (see Averie Cooks for the original recipe). It’s creamy, rich, and cheesy cheesy CHEESY. The secret to this soup is in fact super high quality, extra sharp Cheddar or Red Leicester cheese. While pre-shredded, bagged cheese has its place in the world, that place is not in this soup; the better the cheese, the better the flavor!


BROCCOLI CHEDDAR SOUP

Yields | 4 to 6 servings

  • 1 tbsp + 4 tbsp unsalted butter, divided
  • 1 small sweet yellow onion, minced
  • 1 clove fresh garlic, peeled and minced finely
  • 1/4 cup all-purpose flour
  • 2 cups low-sodium vegetable or chicken stock
  • 2 cups half-and-half (regular or fat-free)
  • 2 to 3 cups broccoli florets, diced into bite-size pieces
  • 2 large carrots, trimmed, peeled, and finely grated
  • 3/4 tsp salt, or to taste
  • 3/4 tsp freshly ground black pepper, or to taste
  • 1/2 tsp paprika (optional), and to taste
  • 1/2 tsp dry mustard powder (optional), and to taste
  • Pinch of cayenne pepper (optional), and to taste
  • 8 ounces grated high quality extra-sharp Cheddar or Red Leicester cheese, plus extra to serve


  1. In a small saucepan, melt 1 tablespoon butter over medium heat. Add minced onion and sauté, stirring occasionally, until the onion is translucent and turning lightly golden, about 4 minutes.
  2. Add garlic and cook for 30 seconds, stirring constantly so it doesn’t burn. Remove from heat and set pan aside.
  3. In a large heavy-bottom Dutch oven or soup pot, add 4 tablespoons butter, flour, and cook over medium heat for about 3 to 5 minutes (until flour is fully incorporated and thickened), whisking constantly.
  4. Slowly add the vegetable stock and half-and-half, whisking constantly. Allow mixture to simmer over low heat for approximately 15 to 20 minutes, or until it has reduced and thickened some. Whisk intermittently to re-incorporate the ‘skin’ that inevitably forms (this is normal).
  5. After simmering 15 to 20 minutes, add the broccoli, carrots, and the onion and garlic you previously set aside. Add the salt, pepper, optional paprika, optional dry mustard powder, and optional cayenne. Stir to combine.
  6. Allow soup to simmer over low heat for about 20 to 25 minutes, or until it has reduced and thickened some. Whisk intermittently to re-incorporate the ‘skin’ that inevitably forms, this is normal.
  7. After simmering for 20 to 25 minutes, add most of the cheese, reserving a small amount for garnishing bowls. Stir in the cheese until melted and incorporated fully, less than 1 minute. Transfer soup to bowls, garnish with reserved cheese, and serve immediately.

[Soup will keep airtight for 5 to 7 days in the fridge. Reheat gently in the microwave.]

Sweet Apple Pancakes with Cider Syrup

Apple Pancakes with Cider Syrup


SWEET APPLE PANCAKES WITH CIDER SYRUP

Yields | 6 servings

Inspiration | Taste of Home


For the pancakes:

  • 2 cups complete pancake mix
  • 1-1/2 cups water
  • 3/4 cup grated apple
  • 1/2 teaspoon ground cinnamon

For the syrup:

  • 1/2 cup sugar
  • 1 tablespoon cornstarch
  • 1/8 teaspoon ground cinnamon
  • 1/8 teaspoon ground nutmeg
  • 1 cup apple cider or juice
  • 2 tablespoons butter, cubed
  • 1 tablespoon lemon juice


  1. In a small bowl, stir the pancake mix, water, apple and cinnamon just until moistened.
  2. Pour batter by 1/4 cupfuls onto a greased hot griddle; turn when bubbles form on top. Cook until second side is golden brown.
  3. Meanwhile, for syrup, in a small saucepan, combine the sugar, cornstarch, cinnamon and nutmeg. Stir in cider until smooth. Cook and stir over medium-high heat until thickened and bubbly, about 5 minutes. Reduce heat to low; cook and stir 2 minutes longer. Stir in butter and lemon juice. Serve with pancakes.


Zuppa Toscana

Zuppa Toscana


While most people lament the arrival of cooler temps in the waning days of summer and early days of fall, I couldn’t WAIT to unearth and dust off my collection of soup recipes this week. After three wonderful – but very hot – years in southern California, Germany’s crisp mornings, drippy afternoons, and windy evenings are utter perfection in my book. Soup weather, how I’ve missed thee!

I’ve been wanting to try this recipe for Zuppa Toscana F-O-R-E-V-E-R. Oh my goodness – it did not disappoint! This is quite simply one of the best soups I’ve ever eaten. The combination of spicy Italian sausage, melt-in-your-mouth potatoes and slightly crisp kale is heavenly. And the broth – oh, the broth! Perfection! My husband and I intended to eat this as leftovers over the course of a few days, but alas, it did not see a second day. Yep, we ate all 12 servings. Two people. In one day. We’re still sad it’s gone, and speak of it fondly. It is that good.

Enjoy, and you’re welcome!


ZUPPA TOSCANA

Yields | 12 servings

Inspiration | Olive Garden & Food.com

  • 1 lb ground mild or hot Italian sausage
  • 4-6 Russett potatoes, diced
  • 1 tsp crushed red pepper flakes
  • 1 tbsp olive oil
  • 1 medium yellow onion, chopped
  • 3 garlic cloves, minced
  • 2 slices raw bacon, snipped into 1/2-inch pieces
  • 1/2 cup white wine
  • 8 cups water
  • 7 tsp Better than Bouillon chicken base
  • 1 bunch fresh kale, stemmed and torn into bite-sized pieces
  • 1 cup heavy cream
  • Freshly ground black pepper
  • Shredded Parmesan cheese (optional), to serve
  1. In a large pot on medium-high heat add the ground sausage and crushed red pepper flakes. Using a wooden spoon, break up the sausage until it is browned and fully cooked through. Pour the cooked sausage into a large bowl and set aside.
  2. In the same pot add the olive oil, chopped onion, and bacon until the onions become translucent and begin to brown (about 10 minutes). Add garlic and cook for an additional 3 minutes.
  3. Add wine to the pot and stir well to de-glaze. Combine water and Better than Bouillon chicken base, mix well, and add to the pot.
  4. Add potatoes and cook until fork tender, approximately 20 minutes. (Note: You may wish to add more salt, but be careful – the chicken base is very salty. Taste for saltiness after each addition.)
  5. After the potatoes are done, add the cooked sausage back into the soup. Using a large spoon, skim off most of the fat from the sausage that floats onto the surface.
  6. Add the fresh kale and stir in to allow the leaves to soften slightly. Reduce the heat to low and add the heavy cream. Stir.
  7. Add freshly ground black pepper, if desired.
  8. Garnish each serving with shredded Parmesan cheese, if desired.


ONE YEAR AGO: Pumpkin Pie Ice Cream

Pumpkin Pie Ice Cream1

Parmesan Polenta Tart with Heirloom Tomatoes

Parmesan Polenta Tart with Heirloom Tomatoes


Polenta – a dish made of yellow or white cornmeal boiled in water or stock into a thick, solidified porridge – is a popular cooking staple throughout central Europe, particularly northern Italy, France, and Switzerland. While I’d eaten it on a handful of occasions in the United States – usually at an Italian restaurant – I’d never before cooked with polenta until giving this recipe a try. I was pleasantly surprised – its remarkably easy to prepare and can be formed and set into virtually any shape.  It doesn’t have a great deal of flavor on its own, but with the addition of a flavorful stock or cheese, polenta is a wonderful base for meat stews, seafood, or vegetables.

This colorful wee tart – recipe courtesy of The View from Great Island – was a huge hit in our household! The tomatoes were delicious – a bit reminiscent of a chunky bruschetta topping – and looked absolutely beautiful arranged atop the bright yellow polenta base. My husband – who usually grumbles his way through anything vegetarian – ate 3/4 of the tart on his own. If that’s not an endorsement, I don’t know what is!


PARMESAN POLENTA TART WITH HEIRLOOM TOMATOES

Yields | 8 servings

Inspiration | The View from Great Island


  • 2 cups polenta (stone ground yellow corn meal)
  • 4 cups water
  • 2 cups reduced fat (2%) milk
  • 1 tsp salt
  • Freshly cracked black pepper
  • 3 tbsp unsalted butter
  • 1 cup grated Parmesan cheese + extra for garnishing
  • 1 generous pint multicolored cherry tomatoes
  • 1 medium heirloom tomato
  • 3 tbsp extra virgin olive oil
  • 1 or 2 tsp white wine vinegar
  • 2 cloves garlic, crushed and minced
  • Salt and black pepper to taste
  • 10 large basil leaves, cut in fine ribbons


  1. Bring the water, milk and salt to a boil in a heavy bottomed pot. Slowly add in the polenta, stirring to avoid lumps. Lower the heat and let it cook gently for about 15 minutes. You will have to stir it most of the time. I like to use a silicone spatula. Be careful because the polenta with splatter as it bubbles, and it’s hot.
  2. Take it off the heat and add the butter and the cheese. Mix well. Add some fresh cracked black pepper, and then taste and adjust the seasonings, if necessary.
  3. Pour the polenta into a greased 9″ springform pan or tart dish. (Note: I ended up using only 3/4 of the polenta, as I didn’t want my tart to be too thick.) Smooth it out quickly so the top is level. The polenta will begin to set up immediately. Let the polenta cool.
  4. Meanwhile, make the tomato topping. Do this no more than one hour before you want to serve the tart. Slice your cherry tomatoes in half. You can cut the larger ones in wedges, and leave the very tiniest ones whole. Chop the regular sized tomato in small chunks. Put them in a bowl with all the juices and add the oil, vinegar, garlic, salt and pepper.
  5. Let the tomatoes sit at room temperature to allow the juices to flow and mingle for up to an hour. Just before you are ready to put the tart together, chop the basil and add it to the tomatoes. (Note: don’t do this earlier, as the basil may turn dark)
  6. Just before you are ready to serve it, spoon the tomatoes and their juices on top of the polenta. Garnish with any remaining basil leaves and sprinkle generously with Parmesan cheese.
  7. Slice with a sharp knife and serve with more cheese.


Lamb Curry

Lamb Curry

Today’s feature is a guest post from my favorite baking goddess – my lovely mum Marilyn – who graciously offered to make this delicious lamb curry during a recent visit to our home in California. The original recipe (from Food.com) is S-P-I-C-Y – just the way I like it! – but can be adjusted for those with less adventurous palates. You may also substitute chicken breast for lamb, if looking for a more budget-friendly family meal. The combination of spices – cinnamon, cloves, turmeric, cayenne pepper, and garam masala – is delectably fragrant while cooking, and absolutely heavenly (if someone fiery) while eating. I would definitely make this curry again, and encourage you to give it a try as well. Enjoy!

LAMB CURRY

Yields: 6 servings

  • 14 cup vegetable oil
  • 2 dried bay leaves
  • 1 black cardamom pod
  • 1 (2 inch) cinnamon stick (or 1/2 tsp ground cinnamon)
  • 10 whole peppercorns (or 1/2 tsp ground black pepper)
  • 4 whole cloves (or 1/4 heaping tsp ground cloves)
  • 1 12 large onions, finely chopped
  • 1 tbsp fresh ginger paste
  • 2 tsp minced fresh garlic
  • 1 12 lbs boneless lamb, trimmed of fat and cut into 1-inch pieces
  • Salt
  • 12 tsp turmeric
  • 2 tsp coriander powder
  • 1 tsp ground cayenne pepper (optional)
  • 1 12 tsp garam masala
  • 4 cups + 2 tbsp water
  • 1 cup diced tomato
  • 1⁄2 cup plain yogurt
  • 2 tbsp chopped fresh cilantro leaves (optional)
  • Steamed basmati rice and naan bread, to serve (optional)
  1. Heat oil in large pot or pan; add bay leaves, cardamom, cinnamon stick, peppercorns, and cloves.
  2. When leaves begin to sizzle and fragrance starts to release, add onions and saute until light golden, about 12-15 minutes, stirring frequently.
  3. Stir in the ginger paste, garlic, and lamb.
  4. Season the lamb with salt; continue cooking, stirring mix for about 20 minutes more, adding a little water if necessary to keep ingredients from sticking to pot.
  5. Add turmeric, coriander powder, cayenne, and garam masala; stir for 5 minutes, adding 2 tablespoons water.
  6. Add diced tomatoes, and cook for 5 minutes, stirring frequently.
  7. Then add remaining 4 cups of water and simmer for 15 minutes, or until meat is almost tender.
  8. Lower heat.
  9. Whisk the yogurt with a fork; then add to pot slowly.
  10. Then cook until meat is done to your liking and sauce is thickened.
  11. Garnish with cilantro leaves and serve with steamed basmati rice, or hot naan.