Baked Ginger Honey Chicken Wings

Ginger Honey Chicken Wings2

Super Bowl weekend is finally upon us, which can only mean one thing – GAME DAY SNACKS!!! Oh, and football. And I guess some people really dig the commercials … and the half-time show … and the endless supply of cheap American beer. But seriously, it’s not about that. Any of that. IT’S ALL ABOUT THE FOOD.

Well, it is in our house anyway. While my husband and I are pretty ambivalent about who wins and who loses, we’re definitely excited about stuffing ourselves silly from opening kick-off to final whistle with these yummy homemade chicken wings. Bathed in a palate-pleasing mixture of soy sauce, honey, ginger and (lots and lots of) garlic, these baked wings can be thrown together by even the most novice chef in less than 30 minutes – with no frying or messy clean-up!

Enjoy in moderation!

*** Looking for something a little spicier? Try my recipe for Spicy Honey Hot Wings! ***


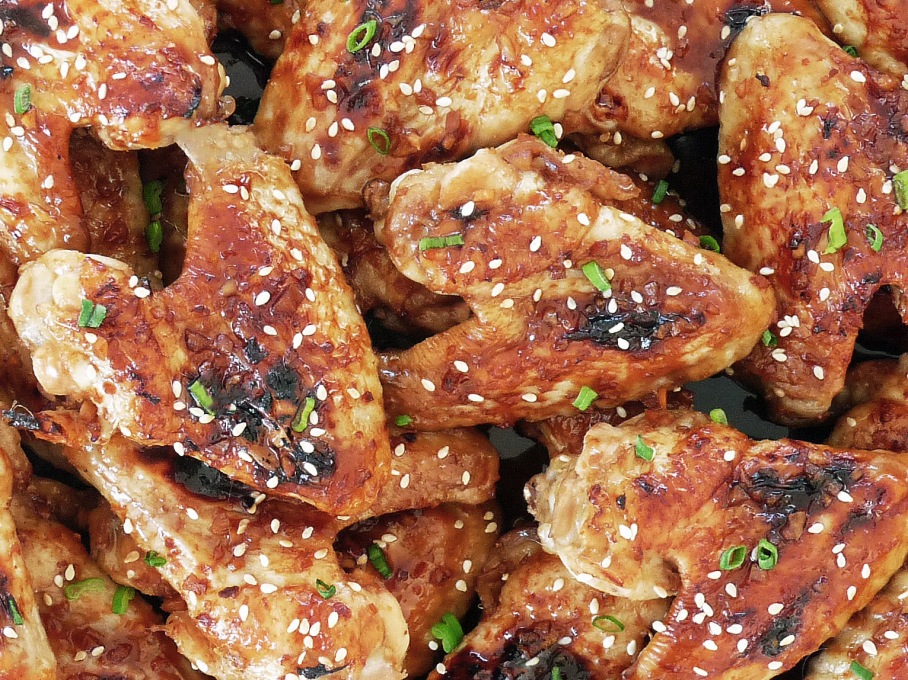
BAKED GINGER HONEY CHICKEN WINGS

Yields | 6 to 8 servings

Inspiration | Simply Recipes

  • Canola or olive oil
  • 1/4 cup soy sauce
  • 3 tbsp clear honey
  • 1 inch piece of fresh ginger, peeled + finely minced
  • 3 cloves fresh garlic, finely minced
  • 1/8 tsp Sriracha (or other hot sauce)
  • 3 lbs raw chicken wings (or drumettes)
  • 2 tbsp toasted sesame seeds
  • 1 green onion, thinly sliced on the diagonal


  1. Preheat oven to 425° Fahrenheit (215° Celsius) with baking rack on the upper third of the oven. Line a roasting pan or thick baking sheet with foil. Rub some canola or olive oil over the foil to keep the wings from sticking.
  2. In a large bowl, whisk together soy sauce, honey, ginger, garlic and Sriracha hot sauce. Add wings and toss to coat thoroughly. Arrange skin-side down on prepared roasting pan or baking sheet, taking care not to crowd the wings.
  3. Roast in oven for 15 minutes. Remove from oven, and – using tongs – flip wings over so they are skin-side up. Return to oven and bake for 10 additional minutes, until nicely browned. Remove from oven and cool for 5 minutes before serving.

Toasted Almond Brittle

Toasted Almond Brittle1

My mum and I made this SUPER easy recipe for brittle (courtesy of Cooking Light magazine) a few years ago, and its still one of my favorite candy recipes. The crunchy sweetness of this almond version beats the peanut variety any day, and its low fat and low calorie content are perfect for sweet tooths trying to ease off desserts after the holidays. It’s also ready to consume in under 45 minutes – what could be better? Enjoy in moderation!


TOASTED ALMOND BRITTLE

Yields | 12 to 14 servings

  •  1 cup finely granulated sugar
  • 1/2 cup light corn syrup
  • 3/4 cup coarsely chopped almonds, toasted
  • 1 tbsp butter
  • 1/2 tsp pure vanilla extract
  • 1/8 tsp salt
  • 1 tsp baking soda


1.  Line a jelly-roll pan or rimmed baking sheet with parchment paper. Set aside.

2.  Combine sugar and syrup in a 2-quart microwave bowl. Microwave on HIGH for 3 minutes (sugar mixture will appear clear and bubbly).

3.  Stir in almonds. Microwave on HIGH for 3 minutes or until mixture is a light caramel color, stirring every minute.

4.  Stir in butter, vanilla and salt. Microwave on HIGH for 1 1/2 minutes or until mixture is the color of peanut butter. Add baking soda and stir until the mixture is foamy.

5.  Quickly pour mixture onto prepared pan. Spread to 1/4-inch thickness and let stand for 30 minutes. Break brittle into pieces to serve.


Per serving:  142 calories, 4 grams fat (0.8 grams saturated), 1.3 grams protein, 27.3 grams carbohydrates, 0.8 grams fiber, 2 mg cholesterol, 0.2 mg iron, 136 mg sodium.

Dill Pickles

Dill Pickles

Full disclosure here: I hate pickles. HATE them. Absolute least favorite food in the world. If the shocked look I receive when mentioning this is any indication, the vast majority of humanity suspects I may be some form of mutant, but I stand firm in my aversion. Inexplicably, however, people love these crunchy, nauseating little things, and as such, I’m bound by culinary duty to share this epic dill pickle recipe with the world. You’re welcome… I guess?

Pickle rant now delivered, this recipe does hold a special place in my heart. The ingredients listed below reflect the original recipe first created by my great-great-grandmother Ada Babcock (born 1875), including her ultra-secret weapon for perfect pickles: grape leaves. The original Baking Goddess – my beloved grandmother Bonnie Jean – was adamant about those grape leaves – leave ’em out, and the whole batch of pickles will be in ruin. My parents happen to have a grape arbor at their home in Washington state, but they can also be found in well-stocked supermarkets or Mediterranean specialty markets.

Note: The ingredients below (with the exception of the cucumbers and those for the brine, which should be adequate to fill approximately 7 tightly packed quart jars of pickles) are listed as per quart-sized jar. In other words, to make a full batch, you’ll need 7 fresh grape leaves, 3 1/2 teaspoons peppercorns, 7 teaspoons mustard seeds, etc.

DILL PICKLES

Makes: 7 quarts

  • 65-70 fresh pickling cucumbers (approximately 3- to 5-inches in length)
  • 1 large fresh grape leaf
  • 1/2 tsp pepper corns
  • 1 tsp mustard seed
  • 2 fresh garlic cloves, halved
  • 1 piece fresh dill umbel
  • 1/4 tsp powdered alum

Brine:

  • 2 quarts water
  • 1 quart vinegar
  • 2/3 cup rock salt
  1. Wash interior of canning jars (seven in total) with hot water (if re-using, sanitize). Set aside to dry.
  2. Wash cucumbers; set aside. Line interior of each canning jar with one grape leaf, dark green side facing outward. Place 8 or 9 cucumbers in each jar (should be  tightly fit), followed by peppercorns, mustard seed, garlic cloves, dill and alum. Each jar should include the full amount of each ingredient listed above.
  3. In a large saucepan or pot, bring brine ingredients to a boil over high heat. Pour boiling brine into each jar until liquid reaches 1 inch from rim. Quickly top and tighten lids. (Note: Lids may make a popping noise at any time over the following several hours as the jars seal internally.) Allow jars to seal and cool for 3 to 4 hours. After cooling, transfer jars to a cool, dark area to pickle for at least 6 weeks.

*Re-posted from my old blog, Cucina Fresca*

Triple Chocolate S’mores Bark

Triple Chocolate S'mores Bark

As a child growing up in the beautiful (but climatologically moody) Pacific Northwest, Memorial Day weekend held a special significance for my nature-loving family: the re-opening of campgrounds, parks, and trailheads closed for the winter months by snow, storms, or flood conditions. While prohibitively large crowds often kept my parents, brother, and I from actually camping out over the long holiday weekend, its arrival never failed to produce excited anticipation for what promised to be three unforgettable months of hiking, camping, and outdoor adventure.

Camping – and I mean real camping, which doesn’t involve electricity or lodging on wheels – is one of my all-time favorite summer past-times. I love finding the perfect spot for my tent, building a small campfire, and searching for shooting stars in the clear night’s sky. This experience is, of course, made infinitely better by the addition of marshmallows, graham crackers, and a handful of Hershey’s bars. That’s right – I’m talking about the oohey-gooey awesome deliciousness of the humble s’more.

Naturally, I couldn’t get out of the house last weekend to go camping [sad face]. I blame it on an injured back, rain, and something called “campground reservations”. Never one to be deterred from – well, anything – I decided to bring s’mores inside. I considered S’mores Dip (still on the agenda) and S’mores Pie (definitely on the agenda), but settled on Triple Chocolate S’mores Bark because – SURPRISE! – I love chocolate.

Best. Decision. Ever.

In all honesty, my attempt at this recipe didn’t turn out nearly as pretty as the original (check out A Kitchen Addiction‘s gorgeous photos!). Appearances aside, it was easy to make and super delicious! I highly recommend this sweet treat for anyone that doesn’t care for the campfire version (*GASP*), or is rained (or injured/reserved) out of the great outdoors. Enjoy!

TRIPLE CHOCOLATE S’MORES BARK

  • 24 ounces dark chocolate
  • 8 ounces white chocolate
  • 3/4 cup (3-4 sheets) graham crackers, broken into pieces
  • 1/2 cup marshmallow bits
  • 2 (1.55 ounce) Hershey’s milk chocolate bars, broken into pieces
  1. Line a 15×10 inch cookie sheet with wax or parchment paper.
  2. Melt dark chocolate according to instructions on package, making sure to stir periodically.
  3. Melt white chocolate according to instructions on package, making sure to stir periodically.
  4. Spread melted dark chocolate onto prepared cookie sheet. Spoon white chocolate over the top. Swirl white chocolate through dark chocolate using a knife or thin rubber spatula.
  5. Sprinkle with graham cracker pieces, marshmallow bits, and broken chocolate bars. Lightly press topping into chocolate.
  6. Place in refrigerator for at least one hour to cool and set.
  7. Break into pieces and store in an airtight container.

Spicy Honey Hot Wings

Spicy Honey Hot Wings

Happy Saturday, baking gods and goddesses!

It’s a big party weekend for lots of Americans, including many friends and family excited to see our home team – the Seattle Seahawks – in Super Bowl XLIX. Truth be told, I can’t summon any excitement for professional American football or the Seahawks, and will be avoiding TVs and social media like the plague. What I DO love, however, is awesome game day snacks, and these hot wings are the undisputed champion!

This recipe comes courtesy of Emeril Lagasse’s Food Network show Emeril Live. I’ve made them twice now, and will never order restaurant wings (or grab a bag from the freezer section – *shudder*) ever again. They’re a really lovely balance of sweet and spicy, and are – despite the somewhat lengthy list of ingredients – really easy to make. Enjoy, and be safe out and about tomorrow!

SPICY HONEY HOT WINGS

Makes: 24 wings or drumettes

  • 24 chicken wings or drumettes
  • 1 1/2 cups all-purpose flour
  • 3 tablespoons garlic powder
  • 3 tablespoons Essence Creole Seasoning (recipe below)
  • 1 teaspoon kosher salt
  • 1/2 teaspoon freshly ground white pepper
  • Vegetable oil, for frying
  • 1 cup hot pepper sauce
  • 1/2 cup honey
  • 3 tablespoons dark brown sugar
  • Blue cheese or ranch dressing, to serve (optional)

Essence Creole Seasoning (also known as Bayou Blast)

  • 2 1/2 tablespoons paprika
  • 2 tablespoons salt
  • 2 tablespoons garlic powder
  • 1 tablespoon black pepper
  • 1 tablespoon onion powder
  • 1 tablespoon ground cayenne pepper
  • 1 tablespoon dried oregano
  • 1 tablespoon dried thyme

To make Essence Creole Seasoning:

  1. Combine all ingredients thoroughly. Set aside.

To make hot wings:

  1. Preheat the oven to 450 degrees Fahrenheit. Line a baking sheet with parchment paper or non-stick aluminum foil. Spray with non-stick cooking spray.
  2. To prepare chicken wings, cut off wing tips at the joint and discard the tips or reserve for another use. In a large bowl, combine flour, garlic powder, Essence, salt, and white pepper. Dredge the wings in the flour mixture, shaking off the excess. Transfer to a plate.
  3. In a large, deep-sided pot, heat several inches of vegetable oil to 350 degrees F. When the oil is heated, dredge the wings a second time, again shaking off the excess.
  4. Deep-fry the wings until crispy and golden brown, approximately 10 to 12 minutes. (I typically have to do this step in 2 to 4 batches)
  5. While wings are frying, mix the hot sauce, honey, and brown sugar in a large bowl until mixture is smooth. Remove the wings from the oil, pat dry and then dip in the hot sauce mixture to coat. Lay the wings on the baking sheet. Bake coated wings until the sauce is dry, approximately 12 minutes. Serve hot with blue cheese or ranch dressing, if desired.